
Choosing and Tuning a Web Stack on a Single Server: Nginx vs Apache, PHP‑FPM and Database Basics
Who This Guide Is For (And What You Will Be Able To Decide)
This guide is for people who are moving beyond shared hosting and starting to look after their own Linux server. You might have:
- A single WordPress or WooCommerce site that has outgrown basic hosting
- A few client sites on one VPS or virtual dedicated server (VDS)
- A small custom PHP application that needs predictable performance
You do not need to be a Linux expert. You should be comfortable using SSH, copying commands, and editing simple configuration files. The goal is to help you understand the pieces of the stack so you can make sensible choices, not just paste large unknown configs from a forum.
Typical scenarios: from shared hosting to your own VPS or VDS
On shared hosting, the provider chooses the web server, PHP version, and database settings for everyone on the same machine. You normally do not see:
- How many PHP workers you have
- How MySQL or MariaDB is tuned
- What web server is in use or how it is configured
On your own VPS or on virtual dedicated servers you are responsible for:
- Choosing Nginx or Apache, and configuring virtual hosts / server blocks
- Installing and tuning PHP‑FPM
- Installing and tuning MySQL or MariaDB
- Updating packages, security patching and basic monitoring
This guide focuses on the first three: choosing and tuning a practical web stack for a single server.
What you will choose by the end
A sensible Nginx or Apache choice for a single server
We will look at how Nginx and Apache handle connections and where each makes sense. By the end you should be able to say something like:
- “For this one WordPress site, I am going to use Apache because I want simple
.htaccesssupport”, or - “For this WooCommerce shop with growing traffic, I am going to use Nginx for better efficiency”
Basic PHP‑FPM settings that match your CPU and RAM
You will learn what PHP‑FPM is, how PHP workers relate to CPU, RAM and concurrent users, and how to set practical values such as pm.max_children for a small VPS.
Safe starter MySQL or MariaDB configuration for WordPress / WooCommerce
We will cover installing MySQL or MariaDB, running the basic secure setup script, and applying a simple configuration that works well for WordPress on a 4 GB server.
Along the way we will highlight where changes can impact uptime and how to test safely.
The Pieces of a Single‑Server Web Stack in Plain English
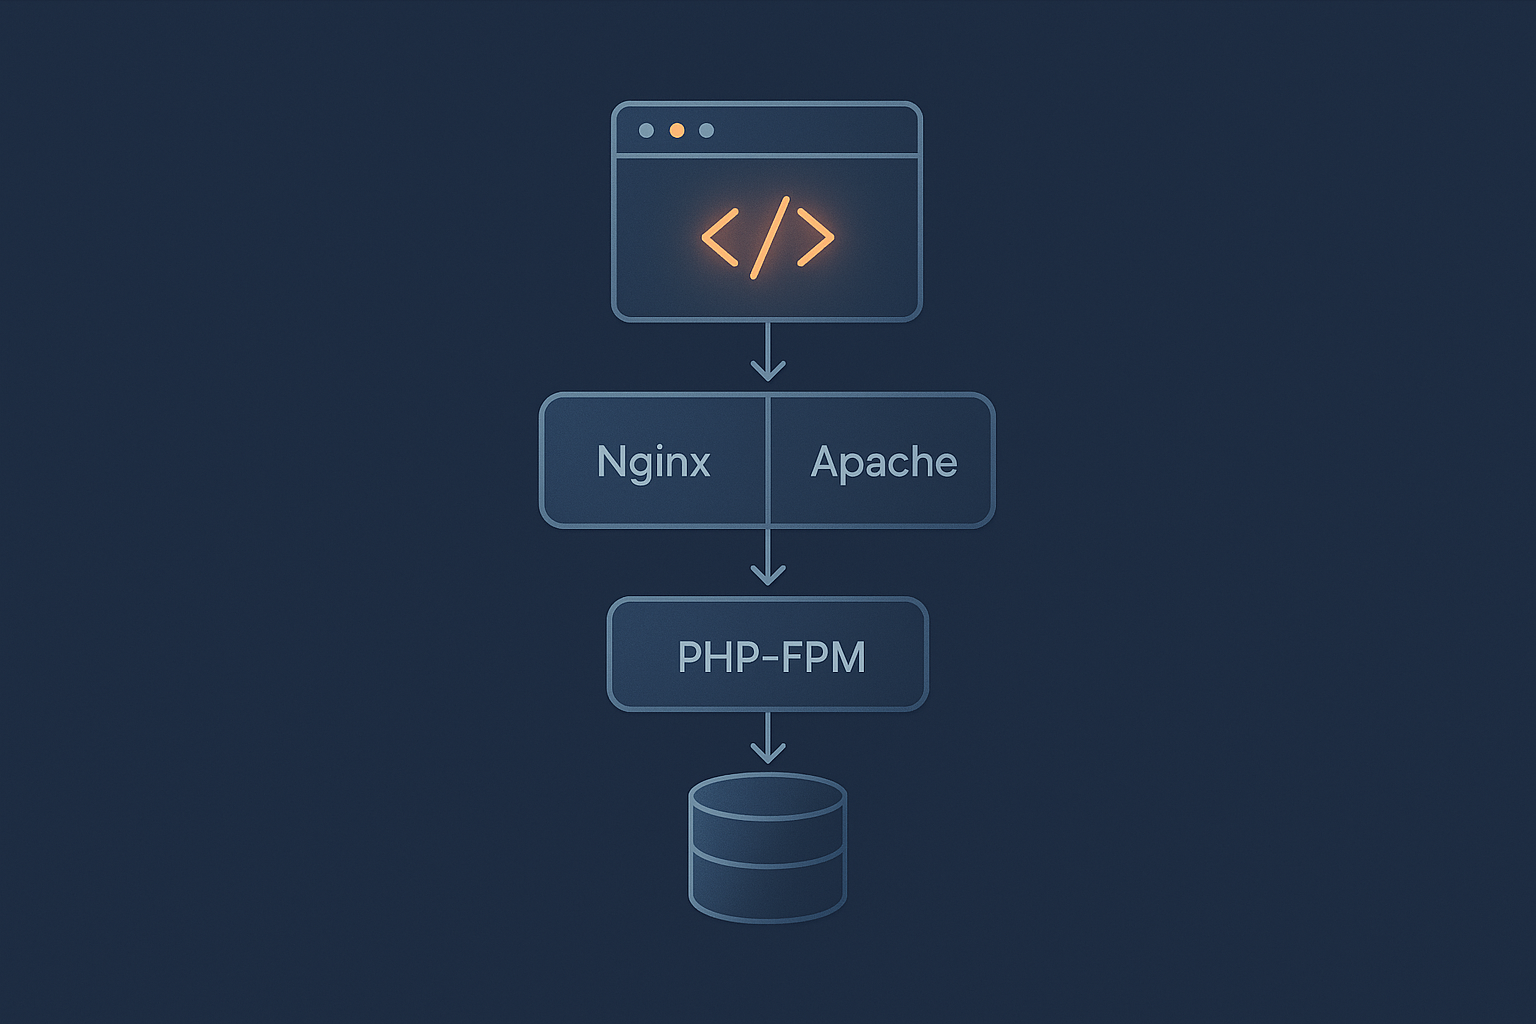
From browser to database: what actually happens on each request
When someone visits your site, a lot happens in a fraction of a second:
- The browser looks up your domain and connects to your server over HTTP or HTTPS.
- The web server (Nginx or Apache) accepts the connection.
- If the request is for a static file (an image, CSS, JS), the web server may serve it directly from disk.
- If the request needs PHP (for WordPress, WooCommerce, or any dynamic page), the web server passes it to PHP‑FPM.
- PHP‑FPM runs your PHP code. WordPress then queries the database for posts, users, products, orders and more.
- MySQL or MariaDB reads data from memory (and occasionally disk) and returns it to PHP.
- PHP assembles the HTML page and sends it back to the web server.
- The web server sends the response to the browser.
All of this can live on one VPS or VDS. Good performance depends on each layer doing its work efficiently and not overloading the others.
LAMP vs LEMP: what the acronyms really mean
You often see the terms LAMP and LEMP:
- LAMP = Linux, Apache, MySQL/MariaDB, PHP
- LEMP = Linux, “Engine X” (Nginx), MySQL/MariaDB, PHP
Linux is the operating system. Apache or Nginx is the web server. MySQL or MariaDB is the database. PHP provides the language that WordPress and many other applications are written in.
On modern stacks, PHP typically runs as PHP‑FPM rather than being built into Apache directly. We will come back to this.
Where performance usually bottlenecks on a single VPS
On a single server, bottlenecks tend to appear in a few common places:
- PHP‑FPM runs out of workers, so requests queue and you see 502/504 gateway errors.
- Database struggles with slow queries or too little memory, especially on busy WooCommerce sites.
- Disk I/O becomes slow if the database or file system is under pressure.
- CPU spikes if PHP or the database are doing heavy work with too many concurrent tasks.
The web server itself is rarely the main limit, as long as it is configured sensibly and you are not mixing multiple heavy stacks without reason.
Choosing Between Nginx and Apache on a Single Server
How Nginx and Apache handle connections differently
Threaded / process models in Apache vs event‑driven Nginx
Apache has different “Multi‑Processing Modules” (MPMs) that decide how it handles connections:
- prefork uses multiple processes. Each process handles one request at a time. This is older and uses more memory.
- worker and event use threads inside processes and can be more efficient.
With Apache, you often end up with many processes or threads, each tied to one or a few connections.
Nginx uses an event‑driven model. A small number of worker processes each handle many connections using an event loop. This usually means lower memory usage and better handling of slow clients or many concurrent connections.
What this means for busy WordPress or WooCommerce sites
For a modest brochure site, either Nginx or Apache will cope well. On busier WordPress or WooCommerce sites, Nginx often has an advantage in:
- Memory overhead per connection
- Handling many long‑lived connections (for example, visitors on slow connections or many assets loading at once)
That said, the biggest wins for WooCommerce usually come from:
- Good PHP‑FPM tuning
- Database indexing and query optimisation
- Appropriate caching and use of object cache
There is a deeper look at PHP workers and WooCommerce in our guide: PHP Workers, Concurrency and WooCommerce.
When Apache makes sense
Htaccess convenience and shared hosting style setups
Apache can read .htaccess files in each site’s directory. This allows per‑site overrides without editing the main server config. Many shared hosting panels rely on this.
Apache is a good fit if you:
- Are used to using
.htaccessrules for rewrites and redirects - Host multiple sites that each expect to manage their own rewrite rules
- Want simpler WordPress permalink setups using existing guides that assume Apache
Example: simple Apache vhost for a single WordPress site
This example shows a basic virtual host file on Ubuntu / Debian‑style systems that listen on port 80. It assumes your site lives under /var/www/example.com/public.
What this solves: It defines how Apache should answer requests for your domain and where your site files live.
<VirtualHost *:80>
    ServerName example.com
    ServerAlias www.example.com

    DocumentRoot /var/www/example.com/public

    <Directory /var/www/example.com/public>
        AllowOverride All
        Require all granted
    </Directory>

    ErrorLog ${APACHE_LOG_DIR}/example.com-error.log
    CustomLog ${APACHE_LOG_DIR}/example.com-access.log combined
</VirtualHost>
What it does:
- Points
example.comandwww.example.comto the document root - Allows
.htaccessto override settings (`AllowOverride All`) - Sets site‑specific access and error logs
Enabling it on Ubuntu / Debian:
sudo a2ensite example.com.conf
sudo systemctl reload apache2
The reload applies changes without dropping connections. To undo this, you can disable the site:
sudo a2dissite example.com.conf
sudo systemctl reload apache2
Safety note: Reloads are generally safe, but if there is a syntax error Apache may refuse to reload. Test the config first with:
sudo apachectl configtest
When Nginx makes sense
Static file performance and lower memory use
Nginx is very efficient at serving static content and handling many concurrent connections. It does not use .htaccess files, which simplifies the overall configuration.
Nginx is a good choice if you:
- Run a busier site or WooCommerce shop where efficiency matters
- Prefer all configuration in one place rather than per‑directory overrides
- Plan to use Nginx features such as caching, rate limiting, or reverse proxying later
Example: simple Nginx server block for a single WordPress site
What this solves: It tells Nginx how to serve your domain, including static files and PHP via PHP‑FPM.
server {
    listen 80;
    server_name example.com www.example.com;

    root /var/www/example.com/public;
    index index.php index.html;

    access_log /var/log/nginx/example.com-access.log;
    error_log  /var/log/nginx/example.com-error.log;

    location / {
        try_files $uri $uri/ /index.php?$args;
    }

    location ~ \.php$ {
        include fastcgi_params;
        fastcgi_pass unix:/run/php/php8.2-fpm.sock;
        fastcgi_param SCRIPT_FILENAME $document_root$fastcgi_script_name;
    }

    location ~* \.(jpg|jpeg|png|gif|ico|css|js)$ {
        expires 30d;
        add_header Cache-Control "public, no-transform";
    }
}
What it does:
- Listens on port 80 for your domain
- Uses
try_filesso WordPress pretty URLs are sent toindex.php - Passes PHP files to PHP‑FPM over a Unix socket
- Sets simple long cache headers for static assets
Enabling it on Ubuntu / Debian:
sudo ln -s /etc/nginx/sites-available/example.com \
  /etc/nginx/sites-enabled/example.com
sudo nginx -t
sudo systemctl reload nginx
Safety note: The nginx -t command tests the configuration and is safe to run. Only reload after it reports “syntax is ok” and “test is successful”. To undo, remove the symlink and reload again.
Practical advice: pick one and keep it simple
Common mistake: running full Apache + full Nginx without a clear reason
It is possible to run Nginx in front of Apache as a reverse proxy. This can make sense on complex setups, but on a single server it often:
- Introduces more moving parts to manage and debug
- Duplicates logging and configuration
- Consumes more memory without clear benefit
Unless you have a specific requirement, start with either Apache + PHP‑FPM or Nginx + PHP‑FPM, not both.
Why “one web server plus PHP‑FPM” is usually enough
For a single VPS or VDS hosting a handful of WordPress or WooCommerce sites, a straightforward stack keeps things understandable:
- One web server: Apache or Nginx
- One PHP‑FPM instance with sensible worker limits
- One MySQL or MariaDB instance with starter tuning
This is easier to monitor, back up, and document. If traffic grows later, you can revisit the architecture using our guide on single vs multi server architecture.
Installing Your Web Server Safely
Check your Linux distribution and package manager
Commands to identify your distro and version
Before installing anything, confirm your distribution. Package names and commands differ between Ubuntu, Debian, CentOS, AlmaLinux and others.
What this solves: Avoids copying the wrong install commands for your system.
cat /etc/os-release
What it does: Prints information about your Linux distribution. Look for NAME and VERSION_ID. This is safe and read‑only.
Installing Nginx or Apache with the package manager
Example commands for Debian/Ubuntu (apt)
Nginx:
sudo apt update
sudo apt install nginx
Apache:
sudo apt update
sudo apt install apache2
What this does:
apt updaterefreshes the package list.apt installdownloads and installs the web server and its default configuration.
These commands may start the service immediately. If this is a production server, plan for a short maintenance window.
Example commands for CentOS / AlmaLinux / Rocky (yum / dnf)
On RHEL‑style systems such as AlmaLinux and Rocky Linux:
sudo dnf install nginx
or
sudo dnf install httpd
What each package actually installs
nginxorhttpd(Apache) binaries- Default configuration under
/etc/nginxor/etc/apache2//etc/httpd - Systemd service units so you can manage start/stop/restart
Configuration files are plain text. Before making changes, it is wise to copy the original:
sudo cp /etc/nginx/nginx.conf /etc/nginx/nginx.conf.backup
You can restore from the backup if something goes wrong.
Service management basics with systemd
Start, stop and enable on boot
What this solves: Lets you control whether the web server is running and starts on boot.
sudo systemctl start nginx      # or apache2 / httpd
sudo systemctl enable nginx     # start on boot
sudo systemctl status nginx
What it does:
startlaunches the service nowenablesets it to start at bootstatusshows whether it is running and recent log output
Safety note: stop and restart will interrupt live traffic. Avoid restarting production services during business hours unless you have a maintenance window or a clear reason.
Safety note: be careful restarting during business hours
Restarting Nginx, Apache, PHP‑FPM or MySQL briefly interrupts requests. A reload usually applies config changes more gently. For example:
sudo systemctl reload nginx
sudo systemctl reload apache2
Even reloads should be done with care on busy sites. Take a snapshot or backup before large changes, and keep a simple change log of what you altered and when.
Where PHP‑FPM Fits In (And Why It Matters)
What PHP‑FPM actually is
PHP as a FastCGI process manager instead of Apache mod_php
Historically, Apache could run PHP inside its own processes using mod_php. That model is less flexible and can waste memory because every Apache worker carries a PHP interpreter, even for static files.
PHP‑FPM (“FastCGI Process Manager”) runs PHP as a separate service. Your web server passes requests for .php files to PHP‑FPM over a local socket or TCP port.
This separation lets you:
- Use Nginx or Apache with roughly the same PHP configuration
- Restart PHP without restarting the web server
- Tune how many PHP workers are running independently of web server connections
Why PHP‑FPM is the standard choice for modern stacks
Modern LAMP/LEMP stacks almost always use PHP‑FPM because it is more efficient and flexible, especially when handling bursts of dynamic traffic such as WooCommerce checkouts or logged‑in users.
Installing PHP‑FPM and common extensions
Choosing a PHP version for WordPress and WooCommerce
WordPress and WooCommerce support specific PHP versions. Newer versions tend to be faster and better supported, but your plugins must be compatible.
At the time of writing, WordPress supports PHP 8.1+ and recommends newer versions where possible. Always check the official WordPress PHP compatibility page before upgrading.
Example apt / yum installs for php‑fpm, php‑mysql, php‑xml, php‑zip, etc
On Ubuntu / Debian:
sudo apt install php8.2-fpm php8.2-mysql php8.2-xml \
  php8.2-zip php8.2-gd php8.2-curl php8.2-mbstring
On RHEL‑type systems (example, PHP 8.2 from a Software Collection or AppStream):
sudo dnf install php-fpm php-mysqlnd php-xml \
  php-zip php-gd php-curl php-mbstring
What this does:
- Installs the PHP‑FPM service
- Adds common extensions that WordPress and WooCommerce expect (MySQL, XML, ZIP, GD for images, cURL, multibyte strings)
After install, enable and start PHP‑FPM:
sudo systemctl enable php8.2-fpm
sudo systemctl start php8.2-fpm
sudo systemctl status php8.2-fpm
Adjust the service name if you installed a different version. The status command is safe and shows whether it is running correctly.
Wiring your web server to PHP‑FPM
Nginx fastcgi_pass example
We saw a basic example earlier. The critical part is the PHP location block:
location ~ \.php$ {
    include fastcgi_params;
    fastcgi_pass unix:/run/php/php8.2-fpm.sock;
    fastcgi_param SCRIPT_FILENAME $document_root$fastcgi_script_name;
}
What it does:
- Matches requests ending in
.php - Passes them to PHP‑FPM over the Unix socket
- Tells PHP‑FPM which script to run and what document root to use
If PHP‑FPM listens on TCP instead, fastcgi_pass might be 127.0.0.1:9000. Always check the PHP‑FPM pool configuration at /etc/php/8.2/fpm/pool.d/www.conf (path may vary).
Apache with php‑fpm via proxy_fcgi (or using event/worker MPM)
For Apache with PHP‑FPM on Ubuntu / Debian, you typically enable some modules:
sudo a2enmod proxy proxy_fcgi setenvif
sudo a2enconf php8.2-fpm
sudo systemctl reload apache2
This uses Apache’s proxy_fcgi module to forward PHP requests to PHP‑FPM. It allows you to use the event or worker MPM without mod_php.
Safety note: Changing MPMs or PHP handlers can break PHP delivery if misconfigured. Test on a staging site where possible and keep backups of original Apache config snippets.
Sizing and Tuning PHP‑FPM for a Single VPS or VDS

How PHP workers relate to CPU, RAM and WooCommerce traffic
Rule of thumb for max_children vs available RAM
Each PHP‑FPM worker is a process that consumes memory. If you set pm.max_children too high, PHP can exhaust RAM, which leads to swapping or the kernel killing processes.
A simple starting approach:
- Estimate memory per PHP process under load (we will cover this shortly).
- Leave enough RAM for the OS, web server and database.
- Set
pm.max_childrenso thatmax_children × memory_per_processfits into the PHP budget.
For example, on a 4 GB RAM server with 1.5 GB reserved for the OS and database, you might allow ~2.5 GB for PHP. If each PHP process averages 80 MB, then 2.5 GB / 80 MB ≈ 31, so a starting pm.max_children of around 20–25 is reasonable.
Why “more workers” is not always faster
More PHP workers let you handle more concurrent requests, but:
- If CPU is saturated, adding workers just makes everything slower.
- If RAM is exhausted, swapping or OOM kills will cause timeouts and errors.
It is often better to have fewer, steady workers with some queueing than to overload the server. Caching, especially full‑page and object caching, often reduces the need for high PHP worker counts.
Key PHP‑FPM pool settings explained
PHP‑FPM pool settings typically live in files like /etc/php/8.2/fpm/pool.d/www.conf.
pm, pm.max_children, pm.start_servers, pm.min_spare_servers, pm.max_spare_servers
pm: process manager mode. Usedynamicfor most cases on a single server.pm.max_children: maximum number of PHP processes that can run at once.pm.start_servers: number of PHP processes started when PHP‑FPM launches.pm.min_spare_servers: minimum idle PHP processes waiting for work.pm.max_spare_servers: maximum idle PHP processes before PHP‑FPM begins stopping them.
Example: sensible config for a 2 vCPU / 4 GB RAM server
Here is a starting point for a single WordPress or WooCommerce site:
pm = dynamic
pm.max_children = 20
pm.start_servers = 4
pm.min_spare_servers = 4
pm.max_spare_servers = 8
What this does:
- Limits concurrent PHP workers to 20
- Starts with 4 workers and keeps at least 4 idle
- Prevents more than 8 idle workers hanging around unused
Applying the change:
sudo nano /etc/php/8.2/fpm/pool.d/www.conf   # edit values
sudo systemctl reload php8.2-fpm
Safety note: Editing pool configs incorrectly (syntax errors, duplicated keys) can stop PHP‑FPM from starting. Keep a backup of the file before editing and test quickly after reloading, for example by refreshing a non‑critical page or a simple phpinfo() script.
Memory budgeting: avoiding swap and out‑of‑memory kills
Estimating memory per PHP process using ps or top
Under normal traffic, you can measure how much RAM each PHP process uses:
ps -o pid,rss,command -C php-fpm8.2 | head
rss shows resident memory in kilobytes. Divide by 1024 to get megabytes. On some systems, the process name may be just php-fpm or include the version differently.
Alternatively, run top and press Shift + H to see threads, or filter by php-fpm. Our article How to Check CPU, Memory and Disk Usage on a Linux Server walks through these tools in more detail.
Common mistake: setting max_children too high and causing 502/504 errors
If you set pm.max_children too high, PHP‑FPM may:
- Use excessive RAM, leading to swapping and slow responses
- Trigger the kernel OOM killer, which may terminate PHP or MySQL
Symptoms often include 502/504 errors from Nginx or Apache. Our guide Diagnosing and Fixing WordPress 502/504 Gateway Errors covers this in depth.
If you see these issues, consider:
- Reducing
pm.max_childrengradually - Adding caching to reduce PHP load
- Increasing server resources if they are consistently exhausted
PHP settings that affect performance
OPcache basics and why you should enable it
OPcache stores compiled PHP bytecode in memory so PHP scripts do not need to be parsed on every request. This significantly improves performance for applications like WordPress.
On many distributions, OPcache is enabled by default when you install the php-opcache extension. Check php.ini (for CLI) and php-fpm.ini or a conf.d file for lines like:
opcache.enable=1
opcache.memory_consumption=128
opcache.max_accelerated_files=10000
Values like these are good starting points for a small server. Adjust only if you understand the impact.
max_execution_time, memory_limit and real‑world defaults for WordPress
In php.ini or pool‑specific overrides, you can tune:
max_execution_time: maximum seconds a script can run. 60–120 seconds is common for WordPress, slightly higher for heavy imports.memory_limit: maximum memory per PHP script. 256M is a common default for WooCommerce sites; very heavy sites might use 512M, but this raises per‑process memory and affects PHP‑FPM sizing.
Adjust these gradually. Increasing memory_limit without reducing pm.max_children may increase the risk of memory exhaustion.
Database Basics: MySQL / MariaDB on a Single Server
Where the database fits in the request flow
Why WordPress and WooCommerce are often database‑bound under load
Most dynamic WordPress pages involve database queries for posts, meta data, options and more. WooCommerce adds additional queries for products, carts and orders.
On a busy site, the database may become the bottleneck due to:
- Slow queries, especially on large tables
- Insufficient memory for the InnoDB buffer pool
- Too many concurrent connections
This is why it is important to allocate a fair share of RAM to MySQL or MariaDB and keep an eye on slow queries.
Installing and securing MySQL or MariaDB
Package install commands
On Ubuntu / Debian (MySQL example):
sudo apt install mysql-server
On Ubuntu / Debian (MariaDB example):
sudo apt install mariadb-server
On RHEL‑type systems:
sudo dnf install mysql-server
or
sudo dnf install mariadb-server
Then enable and start the service:
sudo systemctl enable mysql    # or mariadb
sudo systemctl start mysql
Running mysql_secure_installation (and what it actually does)
What this solves: Sets a root password (if needed) and removes a few insecure default options.
sudo mysql_secure_installation
What it does:
- Prompts to set or improve the root password
- Offers to remove anonymous test users
- Offers to disallow remote root login
- Offers to remove the test database
For most single‑server setups, it is sensible to:
- Set a strong root password
- Remove anonymous users
- Disallow remote root login
- Remove the test database
This script modifies configuration and the mysql system database. It is safe to run once on a fresh install, but avoid rerunning repeatedly on a heavily used production database without understanding the prompts.
Essential server‑level MySQL tuning for beginners
Key settings: innodb_buffer_pool_size, max_connections, query_cache (and why it is off on modern versions)
On modern MySQL and MariaDB with InnoDB, focus on:
innodb_buffer_pool_size: how much RAM is used to cache data and indexes. This is crucial for performance.max_connections: maximum simultaneous DB connections. Too high and you risk memory issues; too low and connections may be refused under load.
The old query_cache feature is disabled or removed in recent MySQL versions because it caused contention on busy systems. You generally should not enable it.
Example starter config for a 4 GB RAM VPS serving WordPress
Create a custom configuration file, for example /etc/mysql/conf.d/g7-tuning.cnf (path may differ on MariaDB or RHEL systems):
[mysqld]
innodb_buffer_pool_size = 1G
max_connections = 100
innodb_log_file_size = 256M
innodb_flush_method = O_DIRECT
What this does:
- Allocates 1 GB RAM to the InnoDB buffer pool
- Limits concurrent connections to 100
- Sets a reasonable InnoDB log file size for small to medium sites
- Uses
O_DIRECTto avoid double buffering on some setups
After creating or editing the file, restart MySQL:
sudo systemctl restart mysql
Warning: Restarting the database on a live site interrupts logins, orders and any active writes. Schedule a maintenance window or use a staging environment first where possible. Always take a database backup or snapshot before changing core DB settings.
Indexing and slow queries in plain English
What an index is and why WooCommerce order tables get heavy
An index is like a table of contents for a database table. It helps MySQL find rows quickly using specific columns.
WooCommerce order tables, especially wp_posts and wp_postmeta, can grow large. Without appropriate indexes, queries to filter or sort orders can become slow.
WordPress core adds standard indexes, but some plugins may need additional ones. Analysing and adding indexes is a more advanced task. On busy shops, this is an area where a managed provider or experienced DBA can save time.
Enabling the slow query log without flooding your disk
What this solves: Helps you see which queries are slow so you can optimise or index them.
Add to a MySQL config file (for example, /etc/mysql/conf.d/slow-log.cnf):
[mysqld]
slow_query_log = 1
slow_query_log_file = /var/log/mysql/slow.log
long_query_time = 1
log_queries_not_using_indexes = 0
This logs queries that take longer than 1 second. Be cautious setting log_queries_not_using_indexes to 1, as it can generate very large logs on busy servers.
After editing, restart MySQL as before. Check the size of /var/log/mysql/slow.log periodically and rotate logs with logrotate to avoid filling the disk.
Connecting WordPress (or Your App) to the Stack
Creating a database and user safely
MySQL commands to create database, user and grant privileges
Log in to MySQL as root:
sudo mysql
Then create a database and user:
CREATE DATABASE wp_example CHARACTER SET utf8mb4 COLLATE utf8mb4_unicode_ci;

CREATE USER 'wp_user'@'localhost' IDENTIFIED BY 'strong_password_here';

GRANT ALL PRIVILEGES ON wp_example.* TO 'wp_user'@'localhost';

FLUSH PRIVILEGES;
EXIT;
What this does:
- Creates a database called
wp_examplesuitable for WordPress - Creates a user
wp_userthat can connect from localhost only - Grants that user full rights on the new database but nothing else
Replace strong_password_here with a secure, unique password.
Why you should avoid using the root database user in wp-config.php
Using the root MySQL user in wp-config.php gives WordPress full access to every database on the server. This is unnecessary and increases risk if a plugin is compromised.
A dedicated user with limited privileges to only one database reduces the potential impact of any security issue or human error.
Configuring wp-config.php for your single‑server setup
DB_HOST, DB_NAME, DB_USER and DB_PASSWORD
In wp-config.php, set:
define( 'DB_NAME', 'wp_example' );
define( 'DB_USER', 'wp_user' );
define( 'DB_PASSWORD', 'strong_password_here' );
define( 'DB_HOST', 'localhost' );
If WordPress and MySQL are on the same server, localhost is typical. You rarely need to change the port unless you customised MySQL.
Optional performance constants such as WP_MEMORY_LIMIT and WP_DEBUG_LOG for troubleshooting
You can also adjust:
define( 'WP_MEMORY_LIMIT', '256M' );
define( 'WP_DEBUG_LOG', true );
What this does:
WP_MEMORY_LIMITsets the PHP memory limit used by WordPress (within the PHPmemory_limitceiling).WP_DEBUG_LOGwrites PHP notices and errors towp-content/debug.logwhich is helpful when troubleshooting.
Safety note: Do not leave debug logging on permanently on busy production sites, as logs can grow large and may expose paths or other internal details. Disable it once issues are resolved.
Caching, Static Assets and Where the G7 Acceleration Network Helps
Where to cache on a single server: web server, PHP, database, browser
Object caching vs full page caching in simple terms
There are several caching layers that can improve performance:
- Full page cache: Stores the entire rendered HTML of a page. Ideal for anonymous visitors on relatively static content.
- Object cache: Caches results of expensive database queries or calculations inside WordPress (e.g. using Redis or Memcached).
- Database caches: InnoDB buffer pool and other DB‑level caches.
- Browser cache: Tells the visitor’s browser to re‑use static assets for a period of time.
On a single server, a combination of a WordPress caching plugin, OPcache, a tuned database and good browser caching can go a long way. For more depth, see our article on WordPress caching layers.
Basic Nginx / Apache rules for static assets
Example: long cache headers for images, CSS and JS
Nginx:
location ~* \.(jpg|jpeg|png|gif|ico|css|js|svg|woff2?)$ {
    expires 30d;
    add_header Cache-Control "public, no-transform";
}
Apache (in vhost or .htaccess):
<IfModule mod_expires.c>
    ExpiresActive On
    ExpiresByType image/jpeg "access plus 30 days"
    ExpiresByType image/png  "access plus 30 days"
    ExpiresByType text/css   "access plus 30 days"
    ExpiresByType application/javascript "access plus 30 days"
</IfModule>
These rules tell browsers to re‑use static assets for 30 days. If you change an asset, use versioned file names so browsers know to fetch the new version.
Offloading heavy work to the edge with the G7 Acceleration Network
Filtering bad bots before they hit PHP or the database
Some traffic is not from genuine visitors. Automated bots can repeatedly hit pages that trigger PHP and database work, adding load for no benefit.
The G7 Acceleration Network sits in front of your server and can filter abusive or non‑human traffic before it reaches PHP or MySQL. This reduces wasted CPU and helps keep response times stable under load without you having to build complex firewall rules yourself.
On‑the‑fly image optimisation to AVIF / WebP and how that affects server load
Large images are a common source of slow page loads and bandwidth usage. The G7 Acceleration Network can automatically convert images to modern formats like AVIF and WebP on the fly. This often reduces file sizes by more than 60 percent without you having to change WordPress plugins or manually compress assets.
Smaller images mean:
- Less data transferred per request
- Lower CPU and disk usage serving static files
- Faster perceived performance for visitors
On a single server where capacity is limited, this can make a noticeable difference to how your stack feels under traffic.
Monitoring and Troubleshooting Your Single‑Server Stack
Checking CPU, RAM and disk when things feel slow
Using top / htop, free -h and df -h safely
When the site feels slow, check resource usage:
top
free -h
df -h
What they do:
topshows CPU and memory usage per process, updated in real time.free -hshows overall RAM and swap usage.df -hshows disk space usage per filesystem.
These commands are read‑only and safe. Look for consistently high CPU, little free memory with heavy swap usage, or full disks. The linked article on checking CPU, memory and disk usage goes into more detail on interpreting output.
Reading key logs for Nginx/Apache, PHP‑FPM and MySQL
Where these logs usually live and what to look for
- Nginx:
/var/log/nginx/access.log,/var/log/nginx/error.log - Apache:
/var/log/apache2/access.log,/var/log/apache2/error.logor/var/log/httpd/ - PHP‑FPM: often
/var/log/php8.2-fpm.logor within/var/log/php-fpm/ - MySQL/MariaDB:
/var/log/mysql/error.logor/var/log/mysqld.log
Look for:
- Frequent 502/504 or 500 errors in web server logs
- PHP‑FPM warnings about
max_childrenbeing reached - MySQL errors about too many connections or crashes
Our guide on understanding Linux system logs helps you locate and read these files more systematically.
Common single‑server issues and what they usually point to
502/504 errors, timeouts and “Error establishing a database connection”
- 502/504 gateway errors: Often caused by PHP‑FPM not responding in time, hitting
max_childrenor crashing. Check PHP‑FPM logs and adjust worker limits or script timeouts. - Slow responses then 504: May indicate overloaded PHP or database, or too low timeouts in Nginx / Apache proxy settings.
- “Error establishing a database connection”: WordPress cannot connect to MySQL. Check
wp-config.phpcredentials, ensure MySQL is running and not out of connections.
When in doubt, check logs first, then resource usage. Avoid changing multiple major settings at once so you can see the impact of each change.
When a Managed VDS or Managed WordPress Is the Safer Choice
Tasks that are realistic to handle yourself
Basic installs, minor config changes, occasional restarts
With a bit of patience, it is realistic to:
- Install Nginx or Apache, PHP‑FPM and MySQL/MariaDB
- Set up a few virtual hosts or server blocks
- Apply basic PHP‑FPM and MySQL tuning as described here
- Monitor basic resource usage and logs
For a small personal or test site, an unmanaged VPS or VDS can be a good way to learn.
Tasks that are better offloaded to a managed provider
24/7 monitoring, in‑depth database tuning, complex caching and security hardening
Some tasks are ongoing and can be time consuming to learn and maintain:
- 24/7 monitoring and proactive response to issues
- Advanced database tuning and query optimisation for busy WooCommerce shops
- Complex caching strategies and edge optimisation
- Regular security hardening, audits and incident response
If these responsibilities feel like a distraction from running your business or developing your application, using managed virtual dedicated servers can offload much of that operational risk while still giving you dedicated resources.
Choosing the right managed option for your application
When to look at managed virtual dedicated servers
Managed VDS is usually a good fit when:
- You have multiple sites or applications on the same server
- Your traffic is growing and downtime would be costly
- You want flexibility in stack choices but do not want to handle deep tuning yourself
When managed WordPress or WooCommerce hosting is simpler
If you primarily run one or two business critical WordPress or WooCommerce sites and do not want regular server‑level responsibilities, then dedicated managed WordPress hosting or specialised WooCommerce hosting is often simpler. Many of the stack decisions and tuning described here are handled for you, letting you focus on the site rather than the server.
Summary: A Sensible Baseline Stack for a Single Server
Recommended baseline setups for common scenarios
Small brochure site
- 2 vCPU, 2–4 GB RAM VPS or VDS
- Apache + PHP‑FPM or Nginx + PHP‑FPM
- MySQL or MariaDB with ~512 MB InnoDB buffer pool
- PHP‑FPM
pm.max_childrenaround 10–15 - Basic browser caching rules for static assets
Standard WooCommerce shop
- 2–4 vCPU, 4–8 GB RAM
- Prefer Nginx + PHP‑FPM for efficiency (Apache is still workable if you prefer)
- MySQL/MariaDB with 1–2 GB InnoDB buffer pool
- PHP‑FPM
pm.max_childrenaround 20–40, based on measured memory use - OPcache enabled, a good caching plugin, and object cache if possible
- Consider the G7 Acceleration Network for off‑server caching, image optimisation and bot filtering
Higher‑traffic content site
- 4+ vCPU, 8+ GB RAM
- Nginx + PHP‑FPM
- MySQL/MariaDB with 4+ GB InnoDB buffer pool if memory allows
- Well‑tuned full page cache and browser cache
- Regular review of slow query logs and database indexes
Next steps: what to tune first as traffic grows
As your site grows, focus on tuning in this order:
- Measure: use
top,free -h, database statistics and logs to see where time is spent. - Optimise caching: reduce unnecessary PHP and DB work.
- Adjust PHP‑FPM workers and timeouts based on measured memory per process.
- Increase
innodb_buffer_pool_sizeas data grows, within your RAM budget. - Consider moving to a larger VPS/VDS or multi‑server architecture when single‑server limits become clear.
If you prefer not to manage these layers yourself, or your application has become critical to your business, exploring managed virtual dedicated servers or dedicated managed WordPress hosting is a natural next step. Both options let you keep the benefits of a well‑tuned stack while handing day‑to‑day server operations to a team that lives in this world every day.